Ready-to-wear clothes are mass produced, hung in stores, filtered through by the customers, value-evaluated in the market, and lastly tried on. If it fits, we win. If it doesn’t, we convince ourselves to get the fittest and comfortable size and maybe spend another 10 dollars to alter away the extra fabrics.
Most of the time the clothes don’t fit. After all, it is catered to general sizes.
Furthermore, brands from the west are looser when Asians put them on. Shorter arms and narrower torso, rack clothes tend to be longer in the sleeve, wide in the waist. And so we try made-to-measure. It’s expensive, it’s a slower process, but we never look back because the cuts fit right, and the right fit looks good, and looking good feels good.
Remember that physical shops have to pay rent and thus have to jack up their prices of their "services". You could have use the time and effort to catch more pokemons! Online custom shirt manufacturers start popping out claiming they could make shirts just as good or better, and cheaper than the traditional neighbourhood tailors or even extravagant tailoring shop who guarantee services and cost.
The online shirting concept is simple and convenient.
Comfortably send in measurements, wait at home in front of the screen, get a custom shirt. It’s a straightforward process, but customers are afraid they do not exactly know how to measure.
Don't worry. We have done the homework for you.
Pictorial guides and importance of each segment of making customized shirt to make you feel comfortable to order online without spending time to going down to a physical shop.

Shoulders
The seam where the sleeves attach to the body of the shirt should adhere as close as possible to the top of your shoulders. Ready-to-wear tend to cut their shirts large to accommodate more people thus often you will see the seams sliding down onto the arms.
1. Place the measuring tape as illustrated from Point A to Point C over Point B.
2. Point A: in line with your armpit (where you can feel a piece of bone)
3. Point B: over the tip of your backbone
4. Point C: in line with your armpit (where you can feel a piece of bone)

Collar
Collar size is measured from buttonhole to button, usually between 14" and 17". the rule of thumb is to be able to button the collar easily with room for two fingers to fit. Any more and it is too loose, any less and it suffocates.
1. Place the measuring tape around the lower part of your neck below your Adam's apple. Stand relaxed.
2. Adjust the measuring tape according to your desired comfort level with 1 finger allowance.

Chest
The most fitting shirts fit comfortably about the chest, underneath the armpits, and across the upper back, allowing you a full range of motion. They should fit you perfectly to your body that the fabrics are laid close to gently.
If the buttons tighten when you are standing at ease with your arms down, it is too tight.
1. Run the measuring tape around the fullest part of your chest
2. Tight up under your armpits and over the shoulder blades, usually above your nipples as illustrated.
3. Allow 2 fingers allowance

Armhole
The size of the armhole is as important as other measurements of a shirt as it dictates how a shirt will fit in the chest, shoulder, and armpit. You may have noticed all the shirt brands with Small-Medium-Large sizing cut their armholes big so as to fit a wide range of body types.
Should the fabric be hanging under the arm, that is not acceptable.
1. It should be contoured in a way that creates a tapered feel under your arm, yet allows you to maneuver freely.
2. With your arm hanging on your side relaxed, measure as illustrated to your desired comfort.
3. 2 fingers allowance
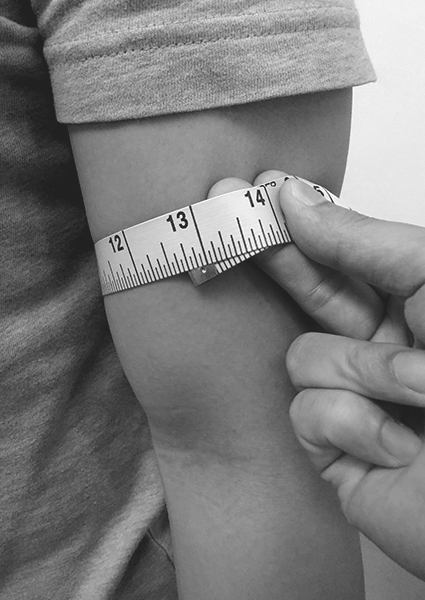
BICEP
1. With your arm hanging at your side and relaxed, measure around your bicep at its fullest point.
2. 2 fingers allowance.


Stomach/ Hips
A fitted shirt should taper from the chest to the waist, following the contours of the body with the minimal excess cloth between the shirt and pants when tucked in depending on your comfort level.
1. Measure around the fullest part of your stomach.
2. Ensure the measuring tape is at the same height around the body.
3. Give 2 fingers allowance.
4. Measure around the fullest part of your hips.
5. Ensure the measuring tape is the same height as your body.
6. Give 2 fingers allowance.


Sleeves and Cuffs
Just like your chest, your arms should be able to expand without excess fabric which tends to give you unflattering look. When buttoned, the cuff should fall right at the base of the thumb depending on one's preference.
You should also consider the size of your cuffs to match your daily watches.
1. Measure along your arm from point A (in line with your armpit) to point B (elbow) then to point C (webbing of the hand).

Torso
The shirt hem should be long enough for you to comfortably wear the shirt tucked or untucked. There are two easy guidelines to assist your measurement.
1. When your shirt is untucked and buttoned, it should fall just above crotch area.
2. Raise your arms above your head and see if the tails pop out from your pants when you tuck in your shirt. If so, your shirt could be a little too short.
With these straightforward guidelines , WA Laaaa!
Tailor Swift.Sg 2015. All Rights Reserved. A Singapore Web Design by Crave Tech.

